Free Instructions: Curls and Cubes

So many beautiful metallic cube beads to choose from in our mix box, what sequences will you make? Or swap out the cubes for a different type of bead altogether
Materials Needed: 1m trace chain ( CHTRSP), 4 x 5mm jump rings ( JR5SP), 1 x Rope Toggle clasp (TOG37SP), 15 x eye pins (EPSP), 2 x coiled links(MT1DE), Metallic square beads from seed bead box (BXSQUMX) and 57 x 3mm silver plated beads (MTEA3031).
Legend:A= one colour square bead B= second colour square beads, C= 3mm silver plated beads
Tools Needed: side cutters (BEESC), two pairs of chain nose pliers (BEECN), round nosed pliers (BEERN).
Instructions
- Choose two colours of square beads that you like. Take 5 eye pins. On three eye pins, thread on 1A, 1C, 1B, 1C, 1A . On two eye pins thread 1A, 1C, 1B, 1C, 1A, 1C, 1B, 1C, 1A (photo 1)

- Choose two different colours of square beads that you like. Take 5 eye pins. On two eye pins, thread on 1A, 1C, 1B, 1C, 1A. On three eye pins thread 1A, 1C, 1B, 1C, 1A, 1C, 1B, 1C,1A (photo 2)

- Choose two different colours of square beads that you like. Take 5 eye pins. On two eye pins, thread on 1A, 1C, 1B, 1C, 1A, 1C, 1B, 1C, 1A. On three eye pins thread 1A, 1C, 1B, 1C, 1A, 1C, 1B, 1C,1A, 1C, 1B, 1C, 1A (photo 3)

- Using your side cutters, trim an eye pin 1 cm above the last bead. Using chain nosed pliers fold the top down, with the fold as close to the last bead. Then using round nosed pliers, turn a neat loop (photo 4)

- Repeat this for all of your eye pins
- Take your beady eye pins from step 1, take one beady eye pin with 3 square beads, using chain nosed pliers, open up one of the end loops, attached it to the loop of a beady eye pin with 5 square beads on, close the loop (photo 5)

- Repeat the with remaining eye pins from step 1, so the sequence is (starting from the end): eye pin (3 square beads), eye pin (5 square beads), eye pin (3 square beads), eye pin (5 square beads) , eyepin (3 square beads) (photo 6)

- Repeat with the beady eye pins from step 2, so the sequence is (starting from the end): eye pin (4 square beads), eye pin (5 square beads), eye pin (5 square beads), eye pin (5 square beads), eye pin (4 square beads) (photo 7)

- Repeat with the beady eye pins from step 3, so the sequence is (starting from the end): eye pin (7 square beads), eye pin (5 square beads), eye pin (7 square beads), eye pin (5 square beads), eye pin (7 square beads) (photo 8)

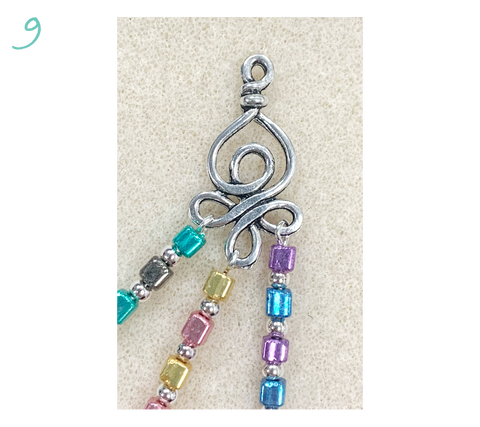
- Open up the end loop of your beady strand from step 7. Attach it to the bottom end loop of your coil link, close the loop. Take the beady strand from step 8, and attach it to the middle loop of the coil link. Take the beady strand from step 9 , and attach it to the last loop of the coil link (photo 9)
- Repeat step 10, with the other ends of the strands, and the other coil link
- Using side cutters, cut two lengths of 13cm chain, or longer if you wish your necklace to be longer) (photo 10)

- Open up a jump ring, use this to attach one half of your toggle, to one end of the length of chain. Close the jump ring. Repeat for the other length of chain, and the other half of the toggle (photo11)

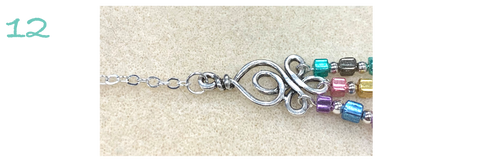
- Open up another jump ring, use this to attach the top loop of the coil link to your length of chain - at the opposite end to the toggle. Repeat for the other coil link, and chain length (photo 12)