Free Instructions: Rainbow Keyring

A great colourful little project to make with little beaders! This may be too tricky for small hands to do independently. But we find a team effort is fun! Little beaders can choose the colours, count out the beads ready, thread the beads and 'supervise' their keyring coming together! Scissors and beads to be used only under adult supervision. Not suitable for children under 3
Materials Needed: 25 Pony beads, we used rainbow colours from our Pony beads mix ( PLCN), 1 metre of cotton covered elastic ( EL, 1 swivel clip (SVS)
Tools Needed: A beading matt will help stop escapee beads! (BMT2), and a sharp pair of scissors (SCIMX).
Instructions
- Choose your 25 pony beads, we chose rainbow colours. If you want to do the same design as us you will need: 2 glitter gold beads, 2 pink beads, 3 purple beads, 4 blue beads, 5 green beads, 4 yellow beads, 3 orange beads, 2 red beads (photo 1)

- Thread 1 glitter gold bead and 2 pinks beads onto your elastic, move them so they are positioned in the middle of your elastic (photo 2)

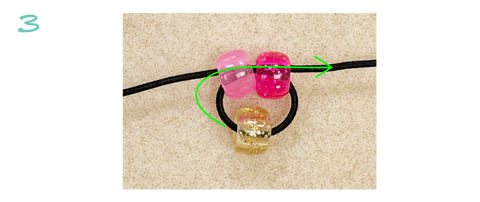
- Take the elastic on the left and pass through the two pink beads in the opposite direction the right elastic is going in. This is called cross weaving (photo 3)
- Thread three purple beads onto your elastic, then repeat the previous step. Add 4 blue beads, repeat the previous step. Continue cross weaving with your different colours; 5 green beads, 4 yellow beads, three orange beads, 2 red beads, 1 glitter gold bead (photo 4)

- Thread your swivel clip onto one of your elastic ends, pass the other elastic end back through in the opposite way, tie an overhand knot, making sure the swivel clip sits on top of the knot (photo 5)

- Pass your elastics through the glitter gold bead in opposite directions (photo 6)

- Continue weaving your elastics back down your beadwork until they meet at your last gold glitter bead, tie two overhand knots and trim (photo 7)
