Free Instructions: Rainbow Kumihimo Bracelet

Create your own lovely rainbow braid using the ancient Japanese art of Kumihimo. If you are just starting out, don’t forget to pick up a braiding disc! Our no tangle thread bobbins, and kumihimo weight may also come in handy to help create the perfect braid
Materials Needed:
Rainbow Colours of S-Lon,
2 x 1metre lengths of each colour:
Yellow (SLC20) , Orange (SLC21), Violet (SLC36) , Blue (SLC17), Red (SLC11) , Green (SLC28), Magenta (SLC12 ), Purple (SLC13),
1 x 6mm end cap ( CEB6SP )
1 x extension chain ( EXCH3SP )
Small Bead Hanger (BH2SP),
Rainbow Charm (MTYS),
3 x 5mm Jump rings (JR5SP)
1 x trigger clasp ( TRGSP )
and Super Glue ( ZAP-1 )
Tools Needed:
A sharp pair of scissors, (SCIMX),
Optional- (but it will make your life a lot easier) no tangle thread bobbins (BOB1), kumihimo weight (KW45),
two pairs of chain nosed pliers ( BEECN-1).
Instructions:
- Hold your strands together at one end and tie a knot, leaving about 5cm of loose threads. If you're using bobbins, wind each one of your cords around a bobbin
- With the numbers facing up, place the knotted end of the thread through the centre of the disc. Clip on your Kumihimo Weight, this creates the correct tension. Hold the disc so that number 32 is at the top and 16 is at the bottom.
- Place one yellow cord in-between 31 & 32.
Place one orange cord in-between 32 &1
Place one yellow cord in-between 3 & 4
Place one orange cord in-between 4 & 5
Place one violet cord in-between 7 & 8
Place one blue cord in-between 8 & 9.
Place one violet cord in-between 11 & 12
Place one blue cord in-between 12 & 13
Place one red cord in-between 15 & 16
Place once green cord in-between 16 & 17
Place one red cord in-between cord 19 & 20
Place one green cord in-between 20 & 21
Place one magenta cord in-between 23 & 24
Place one purple cord in-between 24 & 25
Place one magenta cord in-between 27 & 28
Place one purple cord in-between 28 & 29
Take care to place the right colour in the correct slot, otherwise the pattern will not be made (see photo 1)

- Take the cord from between 16 & 17 (bottom left), and slot in between 30 & 31 (top left) (photo 2)

- Take the cord from between 32 & 1 (top right), and slot in between 14 & 15 (bottom right) (photo 3)

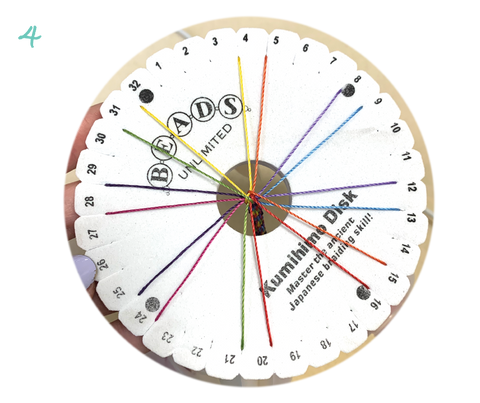
- Turn the disc anti clockwise to the next set of cords. Number 4 will be at the top, number 20 at the bottom (photo 4)
- Remove the cord from between 20 & 21 (bottom left, and slot in between 2 & 3 (top left) (photo 5)

- Remove the cord from between 4 & 5 (top right), and slot in between 18 & 19 (bottom right) (photo 6)

- Turn the disc anti clockwise, so the number 8 is at the top, and repeat the pattern of moving the cord from bottom left - to top left. Then top right to bottom right. Turn your disc and repeat the braiding pattern until you have made the braid to your desired length.
- Dab some super glue into one of your end caps. Carefully remove the cords from the kumihimo disc, trim, and carefully tuck your threads into the end cap. Hold for a few mins until it's secure (photo 7). USing your chain nosed pliers, open up a jump ring, and use it to loop your extension chain, close the jump ring

- Trim the other end of your braid, thread your bead hanger onto your braid (photo 8)

- Repeat step 10 for the other end of your braid, and trigger. Leave overnight so the glue can fully dry (photo 9)

- 13. Using your pliers, open up 1 jump ring, use this to attach your rainbow charm onto the bead hanger, close the jump ring (photo 10)

You're finished!