Beading Basics
At first the art of creating bead jewellery may seem daunting. The object of this guide is to clearly explain the basic tips and techniques. Once you have mastered a few simple concepts you will find bead jewellery making an inexpensive, rewarding and even profitable hobby.
The following is written in plain English and the only technical word unfamiliar to the world at large is ‘findings’. Findings are simply the (mainly) metal parts which are used to construct your creations. Clasps and earwires are the best known examples of findings. There are many others, some of which have very odd sounding names. Don't let any of this worry you as all these references have corresponding illustrations.
|

|
It is advisable to invest in a set of pliers as these will prove invaluable.
- Round-nosed pliers are for bending wire into loops.
- Chain-nosed or flat-nosed pliers are for bending wire, gripping and opening and closing jump rings.
- Side cutters are for cutting wire.
- Crimping pliers give a neat, professional finish to crimps.
- Memory wire cutters make it easy to cut through tough wire.
- Split Ring pliers make it much easier to open split rings


Round-nosed plier Chain-nosed or flat-nosed plier Side cutters


Crimping pliers Memory wire cutters
Necklaces
First choose the beads and/or pendants that take your fancy. You may want to colour co-ordinate with an outfit, or go for a particular style to suit your personality. Almost anything goes. Experiment and have fun!
Necklaces Featuring Pendants
Pendants can be attached to threads in a variety of ways, depending on their form.


Some pendants have a loop at the top (1). Others have a hole running through them, either front to back (2) side to side (3) or top to bottom (4).
There are a number of ways of attaching the pendant to thread of any thickness.
On pendants with small holes or loops running from front to back, use either a jump ring or a bail and loop. The thread can pass through this, leaving the pendant hanging correctly so that it sits flat on your neck.
One jump ring - Open the jump ring with a pair of flat nosed pliers. It is important not to leave any gap at the join on the jump ring. Opening the jump ring sideways will help. Close the jump ring with the pendant attached.
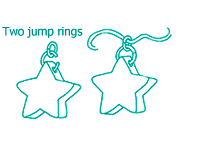
Two jump rings or bail and loop - If the hole runs from side to side,bail and loop could also be used, but check that the size of the loop is big enough for the thread. Open one jump ring, using flat nosed pliers, and join it to both the pendant and the other jump ring. Close it up again with the same pliers. Squeeze the looped bail tightly shut, with the prongs through each side of the hole on the pendant.


Hanging drops - To hang drops you need to create a loop for the thread to run through. To do this, use a headpin. If the hole through the drop is too large for the headpin to hold it, you will need a cup or small bead at the bottom. Position the cup at the bottom of the headpin and add the drop. With the cutters, cut a generous centimetre above the top of the drop. Bend the pin directly above the bead at a right angle and then curl the top of the pin into a loop with the round-nosed pliers.
Necklaces Featuring Beads
First think about the length you want your necklace and whether or not you want the thread to be covered completely. A shorter necklace or choker usually has a largish bead or pendant as its centre piece. A popular design feature of this style is to leave a portion of the cord or leather thong on view. If you are filling the thread and using beads of the same size, you can work out how many you will need once you have decided on the length. Use a tape measure around your neck to get an idea. Then divide that measurement by the length of a bead. So, for a filled choker of 40cm you will need 50 8mm round beads.
Experiment with different sized beads. The most usual way is to use smaller beads at the back where the necklace needs to be comfortable to wear, and larger beads at the front, on prominent display. Consider using spacer beads between larger beads. Choose a colour to tone or contrast, or simply neutral like silver or gold. You could knot the thread in between each bead. It can be very effective to knot groups of beads along the thread, as illustrated.


Threads
There are many threads to choose from. Your choice will depend on the size and weight of the beads and pendants, the size of their holes and whether or not any of the thread will be left showing.
Leather thong is popular for its natural qualities. It may be stiff when first bought but soon softens. It is available in a variety of colours and thicknesses. Leather thong is fairly strong but thin sizes (less than 1mm in thickness) should not be used for single stranded necklaces. It is solid so it doesn’t fray which makes threading relatively easy.
Nymo beading thread is ideal when working beadwoven designs. It is very strong, yet fine enough to go through the smallest bead holes.
Fireline is a thermally bonded, waterproof bead weaving thread that is abrasion resistant, won't fray and has virtually no stretch. It’s ideal for stringing seed beads and, because of its strength it works especially well with multi-strand necklaces.
Cotton thong aka bootlace or ‘veggie leather’ is overtaking genuine leather in popularity. Although it looks similar to genuine leather thong it is more consistent in thickness and quality. It is significantly stronger than leather and is more economical. One minor drawback with cotton thong is that it is woven and may therefore fray a little when used with tight fitting beads.
Silk thread is more costly but can give an attractive and professional looking finish when knotted between each bead. Two colours knotted together make an interesting look. It comes with its own threader, making threading through even very tiny holes easy. It is very strong and supple, ideal for special pieces of jewellery.
Nylon thread passes easily through very tiny holes, without requiring a needle. Its transparent qualities make it unobtrusive, an advantage with certain designs. However, it is a little difficult to knot and can hang somewhat awkwardly unless beads of some weight are used. In time it may stretch. Nylon thread benefits from a dab of glue or nail varnish on knots to strengthen them.


Beading wires such as Beadalon are the strongest threads available. They consist of a base of twisted steel wire, coated in nylon. They make the best long term solution for heavier necklaces featuring glass and other materials that may have sharp edges. Beading wires are strong yet sensitive. They are not happy being knotted and have a tendency to form kinks if care is not taken. One exception to the rule is Beadalon which is kink resistant. Just like a rain mac, note that the key word is ‘resistant’ and not ‘proof’. If you are looking for cheap and cheerful, plastic coated beading wire is perfect. Its zingy colours make it the extrovert of the beading world.
Beading wires are excellent for ‘floating’ necklaces where beads are separated along the wire by crimps. Here’s how to use your crimping pliers:


a) Thread the crimp onto the beading wire. Press the crimp shut using the hole closest to the pliers handle. This gives your crimp a fold in the middle.
b) Flatten the crimp with the hole closest to the pliers tip for a neat finish.
c) Add a small holed bead and a crimp on the other side.
Wires, Chains and Other Alternatives to Thread
There are a number of attractive and simple alternatives to using threads. Your creations can be striking and uncomplicated but be aware that versatility is not the most prominent feature of these products.
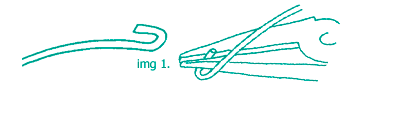

Memory wire retains its shape, hence its title. It is similar to the metal choker in that it is pre-shaped in a range of ready cut lengths. Memory wire does not have pre-formed ends. It is therefore quick and easy to add a wide variety of beads and pendants. When you have added your beads or pendant bend the end into a loop (img 1.). If you are feeling really creative, curl the very end to make a decorative loop (img 2.)
Elasticity is a soft, flexible bead cord which looks like nylon but stretches like elastic. Its limber nature makes it perfect for bracelets particularly when using beads with a small hole. Take one piece of wrist length elasticity and add your beads. Knot the elasticity tightly (but not too tightly) together at the ends. Glue the knot for extra security if you wish. It couldn’t be easier!
Chain can be put to a large range of uses. Charm bracelets have made a big comeback and bag charms have become extremely popular in recent years. A variety of weights are available. Popular choices are 3mm (lightweight) and 5mm (heavyweight). A very delicate chain called trace chain (2mm) is also available and this is perfect if you want to make a dainty looking necklace. Short lengths can be separated by beads on eyepins for a bohemian look. As well as gold and silver plated, other colours such as black antique are also available.


You may also come across Extension chain. This is a short length of chain with a fastener attached. It can be added to an existing necklace or bracelet to add extra length.
Finishing off
Clasps
Depending on the thread you have chosen and on personal taste there are several different ways to finish your necklace. Things to consider are the thickness of the thread, the length of the piece you are making and the ease with which you need to put on and take off your jewellery. There is of course a clasp to suit every taste and style. Here are just a few examples.
Hooks are a simple way to finish. Some have a spring arm so they close completely, giving extra security.
Screw clasps come in two parts which screw together. Some have loops at each end.
Magnetic clasps are similar in appearance to screw clasps, but as the name suggests, the two parts simply clip together magnetically. They are ideal for lightweight necklaces or bracelets and are great if you have trouble with fiddly fastenings.
Bolt rings are used with tags. They are suitable for bracelets and daintier necklaces as they are small and unobtrusive.


How to attach the thread to the clasp
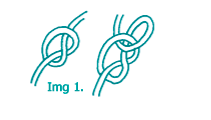
A thin flexible medium such as waxed thread is a good combination with a clasp with loops, a box clasp, bolt ring or hook. A calotte is then used to attach the thread to the clasp. The calotte covers unsightly knots and includes a loop onto which you can attach your clasp. To give your knot a little extra ‘body’ simply pass the end of the thread back through the knot a second time (img 1.)
Lay the knot inside the hollow of the calotte and squeeze it tightly closed. Trim the loose strands which stick out at the top. Open the loop on the calotte and attach it to the clasp(img 2.)
Beading wire can be unhappy when knotted. Use a tiny crimp, squeezed tightly with the chain/flat-nosed pliers. A crimp cover will improve the finish (img 3.)


A leather or cotton thong necklace can be finished in a number of ways. Leather crimps combined with a hook is most popular, particularly for shorter necklaces and chokers. There are two basic types of leather crimps, round (or spring end) crimps and flat crimps (img 4.)
For round crimps ensure a tight fit, doubling the cord if necessary. Grip the end coil and squeeze gently but firmly with the chain / flat-nosed pliers until the spiral has tightened on the cord and is secure. It will help if you keep the end of the spring facing you. Squeeze the end coil only. Add a hook to one loop. This will attach to the loop on the opposite crimp (img 5.)
For flat crimps fold the end of the cord double if it will fit comfortably, and lay it inside the crimp. Fold each side of the crimp down in turn and squeeze tight with the half-round / flat-nosed pliers. Add a hook to one crimp loop and a split ring to the other. A clasp can happily be substituted for a hook (img 6.).


Earrings
Size and weight need to be considered, but apart from that, anything goes. There are findings to attach any type of bead or pendant to any type of earwire. Don’t despair if your ears aren’t pierced, clip-ons or screw-ons are used in exactly the same way as pierced earring findings.
Earrings Featuring Pendants
Some pendants can be joined directly to the earring wire. Others need additional findings.
a) Pendants with holes which run from front to back hang directly on to the earwire.
b) With holes that run from side to side, a jump ring is needed.
c) Holes that run from front to back but are too deep for the earwire loop need two jump rings or a bail and loop. These two findings can also be used to give your earrings a bit of extra ‘swing’


Earrings Featuring Beads
A simple earring is created by threading your choice of beads onto a headpin. An important factor is the size of the hole in the most prominent bead. If the hole is a little too large to fit on the headpin a plain small cup at the base will ensure your bead does not slip off. If the hole is very large (2mm or over) you will need a small bead at top and bottom of your feature bead.
Cut the headpin leaving a generous centimetre. Bend the pin directly above the bead at a right angle and then curl the top of the pin into a loop with the round-nosed pliers. Your first attempts may appear a little untidy, this is perfectly normal. What is important is that the loop is closed. If necessary make a small overlap. The loop can then be attached to an earwire (img 1.)
By joining a headpin and eyepin you can create a long and flexible earring, an earring with maximum ‘swing’! It is not important with beads on headpins and eyepins which way the loops are formed, as the beads don’t have a definite front or back (img 2.)
Hanging hoops enable you to arrange your beads in a circle. Fill the hoop completely or choose a few select beads. It is best to use an odd number of beads. Open the hoop and add your beads. With the flat-nosed pliers bend the tip of the hoop slightly upwards before replacing it in the slot at the top (img 3.)


Earrings Featuring Beads and Pendants
A pendant set off by beads on an eyepin is an attractive design feature. Start by threading your choice of beads onto the eyepin. Be careful to make your loop at a right angle to the existing eyepin loop. In this way the pendant will hang correctly, along the line of your ear for all to admire! (img 4.)
Where the pendant hole is too deep to attach comfortably to the loop on your eyepin, a jump ring comes in handy. In this situation turn the loop on your eyepin in the same direction as the existing loop (img 5.)


Earwires
Long ballwires - For pierced ears the most popular earwires are long ballwires. To attach your pendant and/or beads, the loop at the bottom is easily opened. Round-nosed pliers are best because they will not bend the earwire’s loop out of shape.
Kidney wires are formed to close once in the ear. They have a partly formed loop onto which you attach your pendant and/or beads. Squeeze the sides of this loop together to secure.
Stud and hook are suitable for a shorter and daintier style of earring. The loop is easily opened and closed with a pair of chain-nosed pliers. A scroll back (or butterfly) is needed to hold the stud in place in your ear.
Clip-on or screw-on - Those without pierced ears have a choice of clip-on or screw-on earring findings. Jump rings are useful additions and help your pendants and/or beads to hang freely.
Flat-backed findings are designed so that various pendants can be stuck to them. Choose pendants that have discreet holes and at least one side flat. Use an epoxy resin to stick the flat-backed item onto your stud. Always follow the instructions on the glue packet.


Other jewellery items
Working with beads doesn’t stop at necklaces and earrings, there is a wealth of other creative projects you can enjoy. The following are just a few ideas for other jewellery items.
Working with glue to produce brooches, finger rings etc.
Before using any glue read the warnings and instructions on the packet. Many glues are unsuitable for children to use unsupervised.
Super glue may be used when very fast setting is required. It has a set time of 15 seconds with full bond strength after 1 hour. The surfaces to be joined need to be non-porous and must fit each other exactly.This glue is not recommended for use with plastics such as polythene and polypropylene or metal. Super glue can be used to dab on knots for extra holding, for example inside a calotte. Super glue tends to dry to a cloudier finish than epoxy resin.
Epoxy resin comes in two parts, the resin and the hardener, which must be mixed together in equal amounts. This is a very strong, high quality adhesive and recommended for most fixing in bead jewellery making. The mixing of the two parts forms a paste, allowing inconsistencies in the joining surfaces. A fast drying epoxy sets in 5 minutes, with full bond strength after 1 hour. Epoxy resin tends to dry to a clearer finish than Super glue. Mix equal amounts of epoxy resin and hardener (follow the pack instructions) on a clean disposable surface, with a dead matchstick or something similar.
Accessories
Swivel clips have become a firm favourite with the recent popularity of the bag charm. They are easy to customize. Cut a length of chain and add a jump ring at either end. Attach one jump ring to the swivel clip and the other to a pendant for instant style. Small swivel clips are also available. They can be decorated in the same way and attached to zips, pencil cases and anything else that takes your fancy!
Keyrings - add a pendant to a keyring with the strong jump ring provided.
Mobile phone clips - these are perfect items for the person who likes to decorate everything! Simply attach a pendant of your choice to the split ring provided.


a) Use four stopper beads, two on each end. They should be large enough not to slip through the holes.
b) Start with a slip knot at one end of the thread, leaving a tail of approx 10cm. Add the first stopper bead, then take the thread up through one hole. Thread the second stopper.
c) Thread enough beads to fill the length of the hairslide. Add the third stopper to sit immediately above the second hole. Pass the thread down through the second hole, adding the fourth and final stopper sitting directly below the third. Return the thread back up and out through the third stopper. Add another length of beads.
d) Repeat until the hairslide is full, this may be two, three or more rows depending on the size of your beads. Pass the thread down through the second stopper and the hole in the hairslide. Untie the slip knot and tie a firm knot under the hairslide with the two ends of thread.


